Educational outcomes
Student:
- explains how to design and implement graphical interfaces using natural language (understanding);
- identifies and corrects errors in the source code that implements the above interfaces (understanding).;
- lists the constructs implemented in the source code (understanding);
- implements the aforementioned constructs using the selected programming language (application);
- indicates differences in functionality between two selected programs based on fragments of source code (analysis);
- creates a program that implements specific business requirements using the structures learned in the lectures (synthesis);
Justification
Modern programming languages are mostly based on the object paradigm. Therefore, its practical understanding is a necessary basis for working in this profession. Moreover, programmers often make systems based on analytical materials. And these largely use object-oriented graphical notations (such as UML). During this and the next lessons, you will deepen your theoretical bond, but first of all you will learn how to implement different concepts from object-orientness. This will allow you to design and implement modern business applications.
Creating a GUI in the editor
As mentioned in the previous lesson, in most cases GUI editors are used. One of them, called Windows Builder, is available for Eclipse. We will use it to create a piece of the program that implements the previously designed window. For convenience, once again the same design:
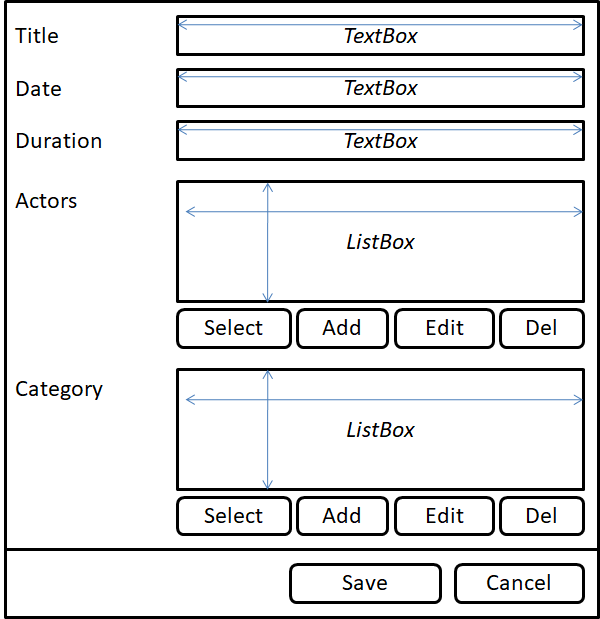
The following movie shows how to use a GUI editor to design a window with proper scaling of its components.
On the next material we see how to rename variables related to attributes and label captions.
And yet another movie showing how to modify the layout manager's settings so that the actor list occupies more space (at the expense of the category).
Our window requires a way to connect particular controls (e.g. buttons) with a source code to execute on click. See the video:
Actually, we should still modify the way the two lists are displayed. We would like to see a scrollbar in the case of a large number of entries. For this purpose, the JList instance should be embedded within JScrollPane. The appropriate modification can easily be done with the editor:
- We select a specific list,
- Click the right mouse button and select Surround with => JScrollPane from the menu.
Adding business logic to the application
Before we start adding functionality to our application, let's take a look at sample date. For our purposes it is enough to have ordinary arrays with predefined movies and actors.
private static Movie[] movies = new Movie[] {new Movie("Title 1"), new Movie("Title 2"), new Movie("Title 3")};
private static Actor[] actors = new Actor[] {new Actor("AB"), new Actor("CD"), new Actor("EF"), new Actor("GH"), new Actor("IJ"), new Actor("KL")};
And another snippet of code that will make links between the movies and the actors. We use methods implemented in association discussions.
movies[0].addActor(actors[1]);
movies[0].addActor(actors[3]);
movies[0].addActor(actors[5]);

movies[1].addActor(actors[0]);
movies[1].addActor(actors[1]);

movies[2].addActor(actors[1]);
movies[2].addActor(actors[2]);
movies[2].addActor(actors[4]);
Now we can show something. We will create a method that will display information about a given video in a previously created window. Initially we will remember the video instance (4), then update the text boxes (7 - 10), and finally create the appropriate model for the actors display list.
public class MovieFrame extends JFrame {
	// ...

	public void setMovie(Movie movie) {
		this.movie = movie;

		// Update the GUI
		setTitle("Movie: " + movie.title);
		txtTitle.setText(movie.title);
		txtLength.setText(Integer.toString(movie.duration));
		txtDate.setText(movie.date.toString());

		ObjectsModel<Actor> modelActor = new ObjectsModel<Actor>(movie.getActors());   // see below for the ObjectsModel class
		lstActors.setModel(modelActor);

		// TODO add categories
	}
}
As we mentioned at the presentation of the Swing library, a large part of the components work on data models. This is also the case with JList. The simplest way to display items in this list is to use the ready class that implements the default model: DefaultListModel. By contrast, this is not always the best solution and to show another possibility, we will create our own model. It inherits from AbstractListModel and must implement two abstract methods: public T getElementAt(int index) and public int getSize(). Let's look at the code below and some comments:
public class ObjectsModel<T> extends AbstractListModel<T> {
	private static final long serialVersionUID = -7858066195.3BL;
	ArrayList<T> objects;

	public ObjectsModel(List<T> objs) {
		objects = new ArrayList<T>(objs);
	}

	@Override
	public T getElementAt(int index) {
		return objects.get(index);
	}

	@Override
	public int getSize() {
		return objects.size();
	}

	public void addObject(T newObj) {
		objects.add(newObj);

		// Inform the model about the change
		fireContentsChanged(this, getSize() - 1, getSize() - 1);
	}

	public void removeObject(T obj) {
		objects.remove(obj);
		// Inform the model about the change
		fireContentsChanged(this, getSize() - 1, getSize() - 1);
	}

	public List<T> getObjects() {
		return objects;
	}
}
- (1). Our class is parameterized by the type of object that will be stored in the model. This will allow us to use it not only for the movies (what we did) but also, for example, for the category (which we leave as one of the tasks to do).
- (3). A container holding our objects.
- (6). Make a copy of the specified (in the constructor) container (see below).
- (10), (15). Implementation of the required abstract methods.
- (19). A method that adds an object to the model (2) and announces a list of its changes (23) - so that the contents of the list are automatically refreshed.
- (26). Method as above but removing objects.
- (32). Meotda returning all objects from the model. You can discuss whether instead of it would not be better to keep them hidden and put up only operations on them - for simplicity we simply return the collection.
While discussing the usability of graphical interfaces, we noticed that it is always worthwhile that the user always has the ability to cancel their operations. For this reason, we designed the Save and Cancel buttons in our window. Unfortunately, this requirement significantly complicates implementation, especially the list of related objects. Without it, we could just plug in the appropriate business methods to create two-way links. Unfortunately, we can not do this because there would be no possibility of cancelling these operations.
In order to be able to cancel the changes, we will store the association locally (in the model - see above) and only after the approval update the business object. This operation must include not only adding new actors, but also removing them. Code of the corresponding method ("connected" to the Save button) and comments:
public class MovieFrame extends JFrame {
	// ...

	protected void SaveData() {
		// Save changes
		movie.title = txtTitle.getText();

		// TODO add data validation (calendar, duration)
		try {
			movie.duration = Integer.parseInt(txtLength.getText());
			movie.date = DateTime.parse(txtDate.getText());
		}
		catch(Exception ex) {
			JOptionPane.showMessageDialog(null, "Please check the correctness of the entered data.");
			return;
		}

		// Update links (due to support 'Cancel' in the window)
		List<Actor> linkedObjects = ((ObjectsModel<Actor>) lstActors.getModel()).getObjects();
		// Deleted objects (we iterate over the copy)
		for (Actor actor : new ArrayList<Actor>(movie.getActors())) {
			if(!linkedObjects.contains(actor)) {
				movie.removeActor(actor);
			}
		}
		//Added objects
		for (Actor actor : linkedObjects) {
			movie.addActor(actor);
		}

		// quitApp(false);
	}
}
- (5). We are updating the title of the movie.
- (9), (10). Updating time and date information (stored as a dedicated class instance
org.joda.time.DateTime; we could also use an instance of Java8 class:LocalDate). In both cases we can expect errors related to badly entered values. A good validation of data and/or specialized controls should be included in the final implementation. - (12). Display messages in case of exception.
- (18). Recover object collection from model.
- (20). A loop that looks at a copy of the current link list and removes those that are not in our model.
- (26). Loop that adds links in the model. Due to the way of implementation, the attempt to add a duplicate will be ignored.
We also have a simple way to add new actors to the movie (Add button). A target window would be needed for the implementation of the actor data. Instead, we will simply generate it with a random name. Let's look at the following method (called from the Add button listener): first create a new actor (5), then recover the model from JList, cast to ObjectsModel< and add object. The model will update the list so that it will be refreshed.
public class MovieFrame extends JFrame {
	// ...

	protected void addNewActor() {
		Actor actor = new Actor("name " + (int)(Math.random() * 10K));

		((ObjectsModel<Actor>) lstActors.getModel()).addObject(actor);
	}
}
It is also worth adding the ability to display information about the selected actor. For this purpose, we will create a simple window (eg ActorFrame) containing the name of the chosen actor and his/her movie list, eg:
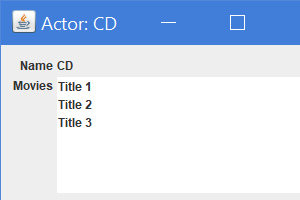
Same as for movie information, in the ActorFrame class we will add a method to display the information. Notice the reuse of our ObjectsModel class, but this time for Movie:
public class ActorFrame extends JFrame {
	// ...

	public void setActor(Actor actor) {
		setTitle("Actor: " + actor.name);
		lblName.setText(actor.name);
		lstMovies.setModel(new ObjectsModel<Movie>(actor.getMoviey()));
		setLocationRelativeTo(null);
	}
}
And how to display information about selected actor? It's pretty simple: add a listener for a double click on the actor. To do this, simply select the specific event in the property pane and double-click on its name - the IDE will generate the required code, which looks something like this:
public class MovieFrame extends JFrame {
	// ...

	public MovieFrame() {
		// ...

		lstActors = new JList<Actor>();
		lstActors.addMouseListener(new MouseAdapter() {
			@Override
			public void mouseClicked(MouseEvent arg0) {
				if(arg0.getClickCount() == 2) {
					showActor(lstActors.getSelectedValue());
				}
			}
		});
	}

	// Displays information about the specified actor
	protected void showActor(Actor actor) {
		ActorFrame actorFrame = new ActorFrame();
		actorFrame.setActor(actor);
		actorFrame.setVisible(true);
	}
}
Let's see what we have achieved. Of course, I encourage you to go through the above steps personally.
Extend the implemented GUI fragment with additional functionality, e.g.
- category support (similarly to actors),
- managing actors,
- selecting Actors for linking (from their extent)
- browsing all the movies.
The provided solution (along with a brief description, source code and example of utilization) can receive up to 5% of the points planned for mini-projects.
Long-lasting actions and the GUI
As we mentioned during the usability discussion, users do not like when the computer is not responding to their commands. This may happen when an application performs some long-lasting action, such as:
- search for items,
- calculations,
- data processing,
- download/upload resources from/to the network,
- waiting for a service availability.
In such a situation, you should inform the user of ongoing activities, keep up to date on their progress, and allow them to stop. Studies show that even long-lasting activities, when accompanied by the corresponding GUI, seems to last less. If we are able to predict that an operation can take a long time, it will not hurt to get confirmation from the user about starting it.
How to do it? Unfortunately the following (pseudo) code will not work as expected:
Public void longLastingMethod() {
	For(...) {
		// Performing long-lasting action,
		// eg. searching for information

		// Refresh the GUI
		progressBar.setProgress(...);
	}
}
Just in case, let's create this simple window with progress bar (it can be created eg in the previously described editor) and adding the code:
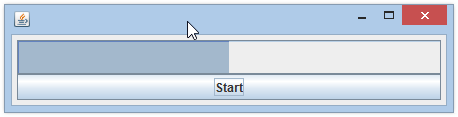
public class ProgressFrame extends JFrame {
	// ...

	JProgressBar progressBar;

	// Update progress bar
	public void setProgress(int val) {
		progressBar.setValue(val);
	}

	// Example method for complex calculations
	protected void startJob() {
		List<Integer> numbers;
		int maxCount = 10M;

		final int maxNumber = 100M; //1M;
		int i = 1;

		numbers = new LinkedList<Integer>();

		while(i < maxCount && isCancelled() == false) {
			Integer curInt = new Integer((int)(Math.random() * (double) maxNumber));
			numbers.add(curInt);

			if(i % 100 == 0) {
				// Possible information on progress
				setProgress((int)(100.0 * (float)i / maxCount));
			}

			i++;
		}

		System.out.println("Finished: " + numbers.size());
	}
}
As you can see in the above movie, according to our assumptions, the refresh of information does not work. The reason is that in popular programming languages (Java, C #), the default implementation performs computations in the same thread as the GUI upgrade. As a result, it will be refreshed when the computer will have "some free time". In the extreme case only when all calculations are completed - that is definitely too late. How to remedy this? You need to use threads of a programming language.
Utilization of the SwingWorker
As we mentioned, in order to properly implement a long-term action, the developer must apply the thread. Usually, for this type of implementation, you should use the auxiliary class that comes with the language:
SwingWorkerfor Java (a few years ago it was not a part of official distribution),BackgroundWorkerfor MS C#.
Both classes are constructed using a similar concept. The programmer must override the method:
- executing long-term action:
SwingWorker.doInBackground(), - done after the action is finished:
SwingWorker.done().
In addition, there are several other methods available, including.
- cancelling operation,
- getting partial results.
The SwingWorker class is parameterized with two types:
-
The return type of the method (longtime action result):
doInBackground()andget(). The latter waits for the end of the whole action and then returns the value of the calculation (note: this waiting blocks the GUI). - Type of values passed as partial results (as a list).
Let's start with something simple - for now without a GUI, but of course using SwingWorker. Let's look at the code below: we inherit the SwingWorker class by parameterizing it with the value of our calculation (String) and Void (we do not return a partial results). Let's override the doInBackground() method with the business logic that implements our long-term operation.
public class Worker extends SwingWorker<String, Void> {

	@Override
	/**
	* Counts the sum of numbers from 1 to maxNumber and return it as String.
	*/
	protected String doInBackground() throws Exception {
		// Count the sum of numbers from 1 to max
		final int maxNumber = 500M;
		int sum = 0;

		for (int i = 1; i < maxNumber; i++) {
			sum += i;
		}

		return Integer.toString(sum);
	}
}
And how to use it? Eg, as shown below:
public static void main(String[] args) {
	Worker worker = new Worker();

	System.out.println("Starting calculations...");

	// We are launching our long-term actions
	worker.execute();

	// But the control comes back and we can do something else
	System.out.println("Waiting for the result...");

	// Exceptions required by SwingWorker
	try {
		// We are waiting, checking if it is finished
		while(!worker.isDone()) {
			Thread.sleep(1000);
		}

		// Calculations completed ==> get the result
		String sum = worker.get();

		System.out.println("Result: " + sum);
	} catch (InterruptedException ex) {
		Logger.getLogger(Main.class.getName()).log(Level.SEVERE, null, ex);
	} catch (ExecutionException ex) {
		Logger.getLogger(Main.class.getName()).log(Level.SEVERE, null, ex);
	}
}
- (2). We are creating an instance of our worker;
- (7). We start calculations;
- (10). Due to the fact that they are implemented in a separate thread, the control immediately goes to the next line (without waiting for the result). Otherwise we would have used the
get()method; - (15). In the loop, "we ask" our worker if has already finished;
- (20). If so, we will get the result.
Now, to the above program, let's add progress information (still on the console). Modification, usage and comments in code:
public class WorkerPlus extends SwingWorker<String, Void> {

	@Override
	/**
	* Counts the sum of numbers from 1 to maxNumber and return it as String.
	*/
	protected String doInBackground() throws Exception {
		final float maxNumber = 500M;
		int sum = 0;

		for (int i = 1; i < maxNumber; i++) {
			sum += i;

			if(i % 100 == 0) {
				// Optional progress information
				setProgress((int)(100.0 * (float)i / maxNumber));
			}
		}

		return Integer.toString(sum);
	}
}
public static void main(String[] args) {
	WorkerPlus worker = new WorkerPlus();

	System.out.println("Starting calculations...");

	// We are launching our long-term actions
	worker.execute();

	// But the control comes back and we can do something else
	System.out.println("Waiting for the result...");

	// Exceptions required by SwingWorker
	try {
		// We are waiting, checking if it has ended and displaying info about the progress
		while(!worker.isDone()) {
			System.out.println("Progress: " + worker.getProgress());
			Thread.sleep(1000);
		}

		// Calculations completed ==> get the result
		String sum = worker.get();

		System.out.println("Result: " + sum);
	} catch (InterruptedException ex) {
		Logger.getLogger(Main.class.getName()).log(Level.SEVERE, null, ex);
	} catch (ExecutionException ex) {
		Logger.getLogger(Main.class.getName()).log(Level.SEVERE, null, ex);
	}
}
Now, let's take advantage of our new knowledge to implement progressive GUIs. First, we need to create the appropriate window (eg in the editor using the description given at the beginning of the lesson) with a progress indicator, eg javax.swing.JProgressBar. Note that our window is an instance of JDialog (modal dialog), not a JFrame. And of course the code:
public class ProgressDialog extends javax.swing.JDialog {
	// ...

	private SwingWorker worker;

	/**
	* Sets a worker connected to the dialog.
	* @param worker
	*/
	public void setWorker(SwingWorker worker) {
		this.worker = worker;
	}

	public void setValue(Integer progress) {
		progressBar.setValue(progress);
	}

	private void btnCancelActionPerformed(java.awt.event.ActionEvent evt) {
		if(worker != null) {
			worker.cancel(false);
		}
		this.setVisible(false);
	}
}
Important snippets:
- (4). A reference to the worker instance. We will need it to cancel any calculations.
- (18). This method is called when the user presses the
Cancelbutton. First, we may call the dedicated worker method (20) and then hide the window.
Now the code that executes our complex calculations. It is very similar to what we have already seen, so let's emphasize only differences:
- (4). Window instance;
- (24). Note that in the loop, in addition to checking the number of repetitions, we also check the cancelation of operations;
- (30). Call the
setProgress()method, which safely updates progress information - see next.
public class NumberGenerator extends SwingWorker<List<Integer>, Void> {
	private List<Integer> numbers;
	private int maxCount;
	ProgressDialog progressDialog;

	public NumberGenerator(int maxCount, ProgressDialog progressDialog) {
		super();

		this.maxCount = maxCount;
		this.progressDialog = progressDialog;
	}

	/**
	* Generates numbers and add them to the list.
	*/
	@Override
	protected List<Integer> doInBackground() throws Exception {
		final int maxNumber = 1M;
		int i = 1;

		numbers = new LinkedList<Integer>();

		while(i < maxCount && isCancelled() == false) {
			Integer curInt = new Integer((int)(Math.random() * (double) maxNumber));
			numbers.add(curInt);

			if(i % 100 == 0) {
				// Optional progress information
				setProgress((int)(100.0 * (float)i / maxCount));
			}

			i++;
		}

		return numbers;
	}

	@Override
	protected void done() {
		super.done();

		// Hide GUI
		progressDialog.setVisible(false);
	}
}
Below is a code that implements the main window, which allows starting the whole operation. Let's look at how are sent notifications about progress (21 - 27).
public class MainFrame extends javax.swing.JFrame {
	// ...

	/** Creates new form MainFrame */
	public MainFrame() {
		initComponents();
	}

	private void generate() {
		final int count = 1M;

		// Create GUI to display info about progress
		final ProgressDialog dialog = new ProgressDialog(this, "Please wait...");

		// Create a generator
		NumberGenerator generator = new NumberGenerator(count, dialog);

		dialog.setWorker(generator);

		// Add a listener to have information about the progress of a long-term action
		generator.addPropertyChangeListener(new PropertyChangeListener() {
			public void propertyChange(PropertyChangeEvent evt) {
				if ("progress".equals(evt.getPropertyName())) {
					dialog.setValue((Integer) evt.getNewValue());
				}
			}
		});

		// Start the action
		generator.execute();

		dialog.setVisible(true);
	}
}
The effect of the above code we saw on the last movie.
Utility class ProgressWorker
Paradoxically, contrary to its name, the SwingWorker class does not directly provide any GUI for the Swing library. Therefore, it is worth trying to change this situation. Let's create a class that makes it easy to work with the GUI and SwingWorker. We include data processing functionality (SwingWorker) and display progress information using the GUI. We'll call it ProgressWorker<finalResult, partialResult>. It will inherit from SwingWorker and contain the modified ProgressDialog instance.
public abstract class ProgressWorker<finalResult, partialResult> extends SwingWorker<finalResult, partialResult> {
	private ProgressDialog progressDialog;

	/**
	* Creates the ProgressWorker instances to display the given message during processing. Invoked from the subclass constructor.
	* @param progressMessage
	*/
	public ProgressWorker(String progressMessage) {
		super();

		progressDialog = new ProgressDialog(null, progressMessage);
		progressDialog.setWorker(this);

		// Add a listener to have information about the progress of a long-term action
		addPropertyChangeListener(
				new PropertyChangeListener() {
					public void propertyChange(PropertyChangeEvent evt) {
						if ("progress".equals(evt.getPropertyName())) {
							progressDialog.setValue((Integer) evt.getNewValue());
						}
					}
				}
		);
	}

	/**
	* Runs a long-lasting action and shows a modal dialog.
	* Should be called instead of execute().
	*/
	public void start() {
		execute();

		progressDialog.setVisible(true);
	}

	/**
	* Called after processing (or canceling).
	* Calls the superclass method and hide the dialog.
	*/
	@Override
	protected void done() {
		super.done();

		// Hide the GUI
		progressDialog.setVisible(false);
	}
}
And how can we use it? Actually almost like the usual SwingWorker. We inherit from the superclass and provide the necessary doInBackground() method. Its implementation is similar to what we have done before, so it does not require additional comment.
public class NumberGenerator extends ProgressWorker<List<Integer>, Void> {
	private List<Integer> numbers;
	private int maxCount;

	public NumberGenerator(int maxCount) {
		// Necessary constructor call from superclass with the text to display
		super("Generating numbers (" + maxCount + ")... Please wait");

		// System.out.println("Generating numbers (" + maxCount + ")... Please wait");

		this.maxCount = maxCount;
	}

	/**
	* Generates numbers and add to list.
	*/
	@Override
	protected List<Integer> doInBackground() throws Exception {
		final int maxNumber = 1000;
		int i = 1;

		numbers = new LinkedList<Integer>();

		while(i < maxCount && isCancelled() == false) {
			Integer curInt = new Integer((int)(Math.random() * (double) maxNumber));
			numbers.add(curInt);

			if(i % 100 == 0) {
				// Possible information on progress
				setProgress((int)(100.0 * (float)i / maxCount));
			}

			i++;
		}

		return numbers;
	}
}
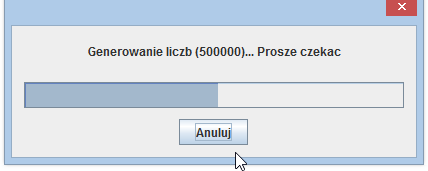
Traditionally an example of the utilization for the above implementation: create an instance (1) and start calculations and display the progress window (2). Verify that the process has not been canceled (5) and retrieve the result (11). As you can see, implementing almost the same as the standard SwingWorker code, we received "free" graphical information about the progress of the operation.
NumberGenerator gen = new NumberGenerator((Integer) spnCount.getValue());
gen.start();

// If canceled we will get an exception when the results are retrieved
if(gen.isCancelled()) {
	JOptionPane.showMessageDialog(null, "Operation canceled.");
	return;
}

// Get the generated list
List<Integer> numbers = gen.get();
Creating a GUI using semantic declarativeness
One of the most recently adopted paradigms used to create GUIs is the declarative approach. Its main feature is that the developer focuses on what should done, leaving how to do it for the computer. In other words, we define the final effect we are interested in (some GUI), and the relevant component/module will take care of its preparation.
We can distinguish two approaches:
- Component declarativeness. The developer is working with UI components. Using a dedicated language (or a configuration file) determines what a window or panel should be. As a result, the amount of information needed is quite similar to the classical GUI creation.Another is the way of providing them. Examples include:
- Microsoft XAML used in Universal Applications, Xamarin Forms, Silverlight, Windows Presentation Foundation (WPF), Windows Phone and Windows Store applications (former Metro);
- Java FXML used in JavaFX;
- Android - XML files defining the GUI.
- Semantic declarativeness. The programmer operates on a higher level of abstraction, such as a data model. As a result, the amount of information required is considerably smaller, but of course at the price of freedom in the interface design. This approach seems to be much more interesting, so we focus on our reflections on it.
What we have written so far, sounds great, but how to put it into practice? It seems that the key to success is finding the balance between our engagement (providing details) and the end result matching our expectations - just like the figure below. We see that the end result is heavily dependent on the amount of work involved. Of course, the goal of using this approach is approaching this man on the left ;)
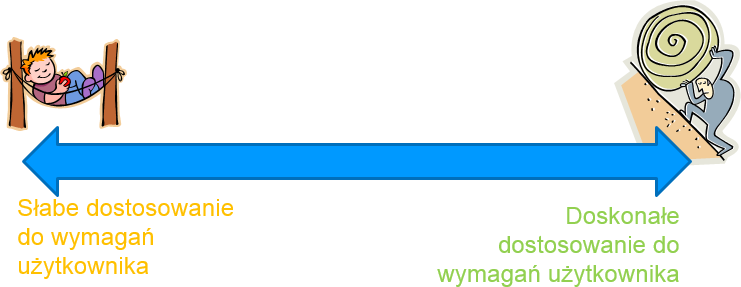
Of course, if the system needs too much information (necessary to adapt it to specific needs) it will be more difficult to use than the classic GUI. Consequently, to reduce our workload we have to accept a certain "universality" of the solution, ie the generated GUIs will be quite similar to each other. However, in typical cases, they can be very useful, such as all kinds of business applications where many forms (windows) are used.
The assumptions of the proposed declarative approach can be formulated as follows:
- The programmer specifies elements of the Java data model (classes) that should have GUIs created for attributes and methods;
- The programmer calls the method that displays the form (window) for the given object.
- The system itself generates forms that allow you to create new data instances, edit them, etc.
- There is an option to further refine details, including: text labels, specific types of widgets;
- We mainly use simple types (but not only): numbers and texts, true/false, date, enumeration type.
We need to solve a few problems to implement this approach. Subsequent sections will be devoted to them.
Read the structure of the business class
Actually, the only way to read class constructs is to use a technology called reflection. It provides information on class structures, methods, attributes, etc. It also allows you to create object instances, call methods, and modify and read attribute content. The key is the Java class named Class and its methods: getDeclaredFields() and getDeclaredMethods().
Defining interface elements
The next question is how to define the model elements to generate GUI controls? probably we would not want to do it for all items. It is also hard to imagine some clever algorithm which can automatically determin it for the general case. Actually, we have the following possibilities:
-
Configuration file, such as XML, or Java properties;
-
passing the appropriate parameters to the method;
-
use Java annotation. They can be defined by the programmer and affect almost all language constructs, including classes, attributes, methods. The popular example is
@OverrideJava@Override public String toString() { return "My own implementation of toString()"; }During the operation of the program we have the ability to read them (eg for an attribute) and react (eg generate a control).
- Development of dedicated domain language (Domain Specific Language - DSL). By creating your own DSL embedded in the host language (eg Java), you need to decide they will interact with each other. This may be plain text, such as SQL in JDBC. This solution obviously has a number of drawbacks (eg lack of typological control). That is why it is better to use the so-called Fluent API. The idea is to "cleverly" define classes, methods, and attributes so that their calls would look like DSL commands (see below).
Later in this lesson we will show examples of annotations and DSL solutions.
Customizing the Generated GUI
As we mentioned, we will create appropriate annotations to determine which model elements are to have generated GUIs. They must have certain parameters to customize the generated widgets. Of course, the number of these parameters should be as small as possible. Moreover, in order to further facilitate the use of the created annotations, the parameters will have default values. By introducing a breakdown into attributes and methods, we can individualize the annotation functionality - the set of parameters will be similar but the default values are different. Let's look at the possible annotation parameters:
label. Describes the label attached to the widget. If it is empty (the default value), then the name of the attribute or method will be used. This parameter is required because sometimes we need to enter special names (eg, space or national characters);widgetClass. A widget class that will be used to edit and display data. The default value is the use of a text box (JTextBox);tooltip. Short text displayed when the cursor is placed on an element.getMethod. The method used to read attribute values. The default value contains an empty string and indicates a getter and setter approach;setMethod. Same as for getMethod, but for writing.showInFields. Flag indicating whether this element should be visible in the field view;showInTable. Flag indicating whether this element should be visible in tabular view;showInSearch. A flag indicating whether this item should be visible in the search view.order. The number defining the order of the widget in the form;readOnly. A flag that defines whether data is read-only (without modification);scaleWidget. Specifies whether the widget should change its size when modifying the form size.
Linking GUI controls with business model
We need to determine which set of controls will support our library. The simplest and most universal approach is using JTextBox. Of course, they can be improved. Using the special ComboBox to work with the enumeration type, CheckBox supports boolean type and any other - defined by the programmer.
Another issue is the transfer of data to/from the control. Because our solution is generic (ie capable of working with different types of data) we need to establish a common "type" of data being sent: of course, this will be text (String). We require each of the controls used to handle two methods: void setText(String) - write data to the control and String getText() - read them from the control. Fortunately, most of the controls provided by Swing support these methods. Sometimes we need to create a simple wrapper for the existing control so that it works with the above methods. In a few situations, you may need to make significant modifications or implement your own control.
Examples for senseGui
Below are examples of senseGUI library created by me as part of my research conducted in PJATK. It allows you to generate GUI based on annotated Java classes. We will not discuss its implementation in detail (I used the ideas discussed above), but of course I encourage you to experiment and consult with me.
Let's say we have a simple business class for which we need a GUI:
public class Person {
	private String firstName;
	private String lastName;
	private Date birthDate;
	private boolean higherEducation;
	private String remarks;
	private int SSN;
	private double annualIncome;

	public int getAge() {
		// [...]
	}
}
To use senseGUI, just decorate with the annotations and call up a simple method. Notice that we are dealing with so-called POJO without any special interfaces or superclasses.
public class PersonAnnotated {
	@GUIGenerateAttribute
	private String firstName;
	@GUIGenerateAttribute
	private String lastName;
	@GUIGenerateAttribute
	private Date birthDate = new Date();
	@GUIGenerateAttribute
	private boolean higherEducation;
	@GUIGenerateAttribute
	private String remarks;
	@GUIGenerateAttribute
	private int SSN;
	@GUIGenerateAttribute
	private double annualIncome;
	@GUIGenerateMethod
	public int getAge() {
	// ...
	}
	// Standard getters/setters methods
}
As a result of running the following code we get a ready-made pane to display and edit the business object.
JDesktopPane jdp = new JDesktopPane();

PersonAnnotated person = new PersonAnnotated();
SingleObjectPlusFrame personFrame = GUIFactory.getObjectFrame(person, jdp, false, true, true);
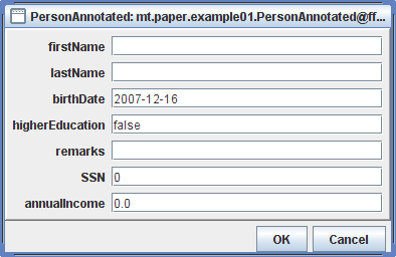
As for one line of code (#4), the effect is good, but we can correct it by modifying the default annotation parameters. Thanks to that we have valid attribute names, proper order, the age is read only, field Remarks is scaled, and boolean is displayed in the checkbox.
public class PersonAnnotated {
	@GUIGenerateAttribute(label = "First name", order = 1)
	private String firstName;
	@GUIGenerateAttribute(label = "Last name", order = 2)
	private String lastName;
	@GUIGenerateAttribute(label = "Birth date", order = 3)
	private Date birthDate = new Date();
	@GUIGenerateAttribute(label = "Higher education",  widgetClass="mt.mas.GUI.CheckboxBoolean", order = 5)
	private boolean higherEducation;
	@GUIGenerateAttribute(label = "Remarks", order = 50,
	widgetClass="javax.swing.JTextArea",scaleWidget=false)
	private String remarks;
	@GUIGenerateAttribute(order = 6)
	private int SSN;
	@GUIGenerateAttribute(label= "Annual income", order=7)
	private double annualIncome;
	@GUIGenerateMethod(label="Age", showInFields = true, order = 4)
	public int getAge() { ...}

	// Standard getters/setters methods
}
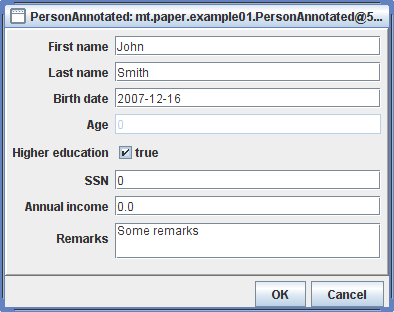
It is also possible to combine senseGUI with the previously created ObjectPlus library. This will allow us to manipulate extent, linked objects and search information. Sample window (of course, also automatically generated):
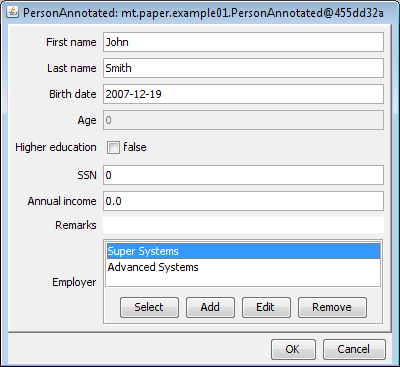
Example utilization of GCL
Another solution I've created is GCL (GUI Creating Language). Its effects are similar, but instead of using annotations we use dedicated DSL (and the Fluent API concept). This approach may be better when, for example, we want to display different interfaces for the same business class (writing other DSL commands). Of course, I encourage you to experiment and analyse the attached sources.
We will reuse the usual Person class, defined above. To view the GUI for editing, simply write the following code snippet. Let's take a look at how to combine each of our DSL commands - reading it together makes sense: create.frame.usingOnly(person) and of course the correct part of Java. On the other hand, if someone has taken a look at the implementation, they will see the strange names of the constructs, such as the usingOnly (...) method.
JFrame frame1 = create.
				frame.
				usingOnly(person);
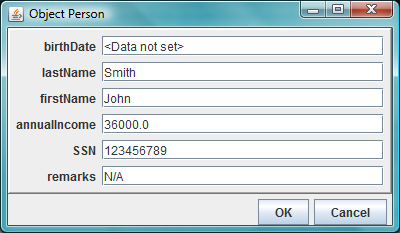
The Fluent API is based on returning the same (or similar) object type in consecuive calls. In addition, we use specific naming of individual constructs (classes, methods, attributes). This makes it possible to write language commands that are readable. Of course, at the same time we have strong typological control, IDE hints, etc. Examples of such approaches are the jQuery library, one of the ways to use LINQ and my GCL.
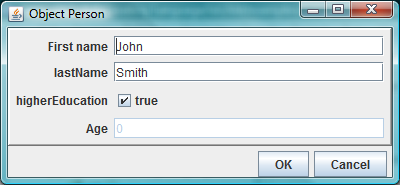
And here is another example - this time we changed the look of our window and added a validator for the lastName attribute:
JFrame frame =  create.
				frame.
				using(person).
				containing(
						attribute("firstName").as("First name"),
						attribute("lastName").validate(new ValidatorNotEmpty()),
						attribute("higherEducation"),
						method("getAge").as("Age"));
TODOin a comment that is treated as a task to create. It will be displayed in a special view (in the Eclipse: Window/Show view => Tasks menu). It is worth to keep them up to date so that you do not forget to realize some functionality.